This article describes how to upgrade the Smart ID Digital Access component from version 5.13.x (includes 5.13.1, 5.13.2, 5.13.3, 5.13.4, 5.13.5) to 6.0.5 or above for single node appliance as well high availability or distributed setup.
Upgrades from 5.13.1 to 6.0.5 or above should not be done through virtual appliance or admin GUI. Follow the steps in this article for a successful upgrade.
Important
- Version 5.13.0 cannot be directly upgraded to 6.0.5 or above. You must upgrade to 5.13.1 or above, since 5.13.0 has Ubuntu 14.04, which is not a supported version for Docker.
- When upgrading from 5.13.1, or above, to 6.0.5 and above, the appliance OS is not upgraded. You must manually upgrade the OS. However, the recommended option is to provide your own Linux Virtual Machine (VM) instead. If you still want to upgrade the appliance, you need to follow the upgrade instructions for Upgrade from 5.13 to 6.0.2 first, and then Upgrade Digital Access component from 6.0.2 and above to 6.0.5.
You only need to perform these steps once to set the system to use docker and swarm. Once this is all set, future upgrades will become much easier.
There are two options, described below, for upgrading from version 5.13.1 and above to 6.0.5 and above:
- Migrate - This section describes how to upgrade, as well as migrate, the Digital Access instance from appliance to a new Virtual Machine by exporting all data/configuration files with the help of the script provided. (Recommended)
- Upgrade - This section describes how to upgrade Digital Access in the existing appliance to the newer versions.
Download latest updated scripts
Make sure you download the upgradeFrom5.13.tgz file again in case you have downloaded it before 29th October, 2021 to get the latest updated scripts.
- Make sure that you have the correct resources available (memory, CPU and hard disk) as per requirement on new machines.
- Install docker, xmlstarlet, although upgrade/migrate script will install docker and xmlstarlet if not installed already. But if it is an offline upgrade (no internet connection on machine) then install the latest version of docker and xmlstarlet before running the migration steps.
- The following ports shall be open to traffic to and from each Docker host participating on an overlay network:
- TCP port 2377 for cluster management communications.
- TCP and UDP port 7946 for communication among nodes.
- UDP port 4789 for overlay network traffic.
- For High Availability setup only,
- Make sure you have the similar set of machines, since the placement of services will be same as on the existing setup. For example, if you have two appliances in High Availability setup, you must have two new machines to migrate the setup.
- Identify the nodes, as the new setup should have equal number of machines. You must create mapping of machines from the old setup to the new setup.
Identify the manager node. In docker swarm deployment, one machine is the manager node. Make sure that the administration-service node in the older setup replaces it during upgrade/migrate.
Copy upgradeFrom5.13.tgz to all nodes, and extract the .tgz file.
Extracttar -xzf upgradeFrom5.13.tgz
Edit the configuration files in the manager node.
- Place the da_migrate_5.13.tgz file inside the scripts folder, upgrade/scripts/.
- Run the upgrade script to import files/configuration from the older setup and upgrade to the latest version.
- Although the upgrade script installs docker and pulls the images from the repository, it is recommended to install docker and pull the images before running the upgrade. That will reduce the script run time and also the downtime of system.
- Verify the Digital Access tag in versiontag.yml (<path to upgrade folder>/docker-compose/versiontag.yml) file. Same tag will be installed as part of upgrade. If it is not correct tag, please update it manually.
Run the script pull_image.sh to pull images on all nodes.
Note: In case of offline upgrade, load DA docker images to the machine also If you are using internal postgres, load postgres:9.6-alpine image on the manager node.
Pull imagessudo bash upgrade/scripts/pull_image.sh
Run the import command:
On the manager node
Run import command on manager nodesudo bash upgrade/scripts/upgrade.sh --manager --import_da (on node running administration-service)
- To set Docker Swarm provide your manager node host IP address.
- In case you are using an external database, select No to skip postgres installation.
(Only applicable for High Availability or distributed setup)
The script prints a token in the output. This token will be used while setting up worker nodes.
Example:
docker swarm join --token SWMTKN-1-5dxny21y4oslz87lqjzz4wj2wejy6vicjtqwq33mvqqni42ki2-1gvl9xiqcrlxuxoafesxampwq 192.168.253.139:2377
Here the token part is:
SWMTKN-1-5dxny21y4oslz87lqjzz4wj2wejy6vicjtqwq33mvqqni42ki2-1gvl9xiqcrlxuxoafesxampwq 192.168.253.139:2377If you cannot find the token in the upgrade script output on the manager node, get the cluster join token by running this command:
Get cluster join tokensudo docker swarm join-token worker
On worker nodes
Run import command on worker nodes (Only applicable for High Availability or distributed setup)sudo bash upgrade/scripts/upgrade.sh --worker --import_da --token <token value> --ip-port <ip:port> (on all other worker nodes)
- Follow the screen messages and complete the upgrade. Check for any error in the logs. During the upgrade, it will extract the da_migrate_5.13.tgz files and create the same directory structure as it was on the older setup.
- On the manager node, it will install PostgreSQL database as docker container and import database dump from the older machine.
- After the scripts are executed, the .tgz file will still be there. Delete it once it is confirmed that the upgrade process has been completed successfully.
Verify if all nodes are part of the cluster by running this command.
Verify if all nodes are part of clustersudo docker node ls
Example:

Identify nodes ID, master and worker where the service will be distributed.
Identify nodessudo docker node inspect --format '{{ .Status }}' h9u7iiifi6sr85zyszu8xo54lOutput from this command:
{ready 192.168.86.129}IP address will help to identify the Digital Access node.
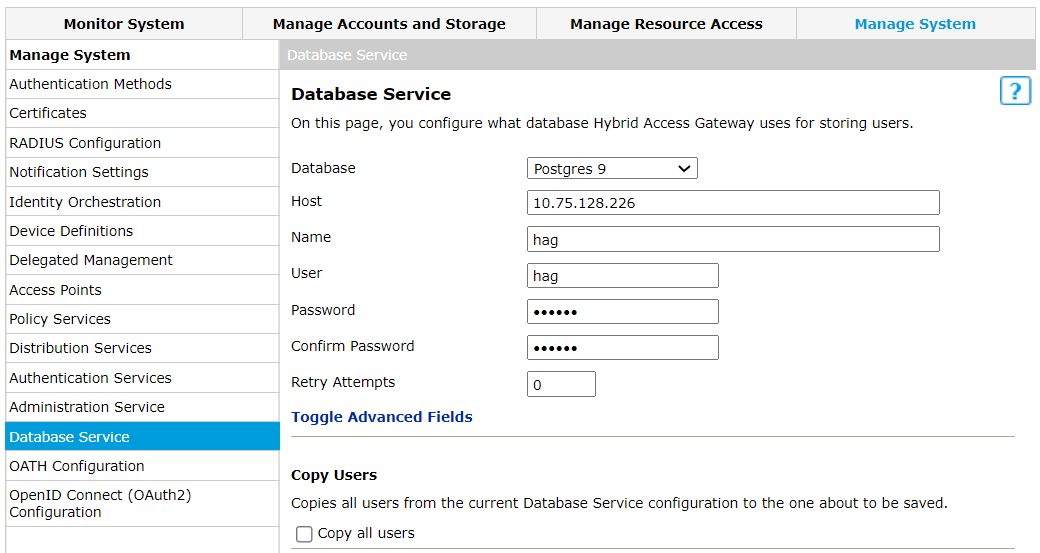
- Log in to Digital Access Admin. If you use an internal database for configurations, provide the host machine IP address to connect the databases (HAG, Oath, Oauth).
- Publish the configurations.
- Change the internal host and port for each added service according to the docker-compose.yml and network.yml files.
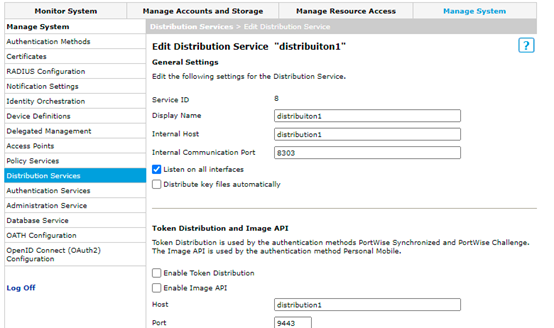
- Go to Manage System > Distribution Services and check “Listen on All Interfaces”.
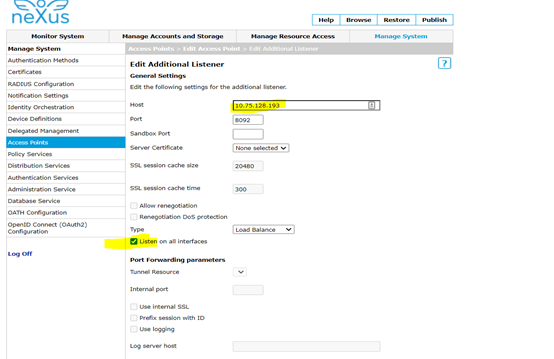
- Go to Manage System >Access Points and provide the IP address instead of the service name. Also check "Listen on all Interfaces".
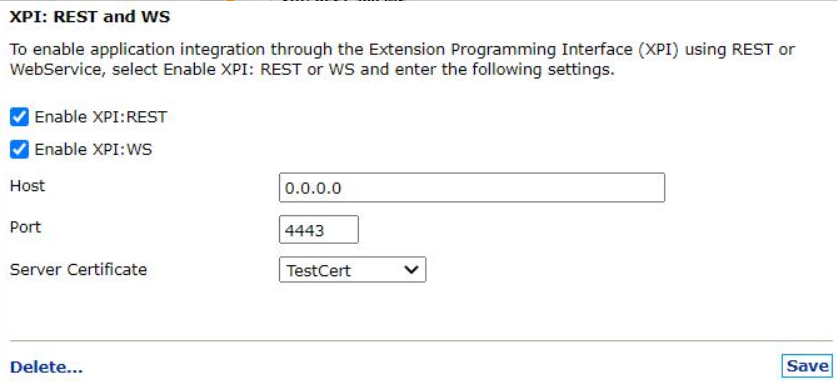
- If you want to enable XPI and SOAP services, the expose port ID should be 0.0.0.0 in Digital Access Admin.
Redeploy the services using this command on the manager node.
Restartsudo bash /opt/nexus/scripts/start-all.sh
Prerequisites and Preparations
- Expand the root partition, since on 5.13.x appliance the size of the disk is only 4 GB. It must be expanded before upgrading, for docker to work, since it requires more space.
- Boot the virtual machine and log in to it.
- To find out which hard disk to expand, do
df -hto see which disk partition is mounted for root file system, /dev/sdc1 or /dev/sdb1. - Assuming that sdb1 is the primary hard disk, shut down the virtual machine and expand the size of the virtual machine's disk (as mentioned in step 1 above), from 4GB to minimum 16GB via editing the Virtual Machine settings.
- If /dev/sdb1is mounted, hard disk 2 needs to be expanded.
- If /dev/sdc1is mounted, hard disk 3 needs to be expanded.
- Boot the virtual machine and log in again.
- Verify the disk size of mounted disk by running this command:Check disk size
fdisk -l
- Once the disk is successfully expanded, resize the partition and expand the file system.
Resize the partition using the command below. This will display the free space available on the disk.
Resizesudo cfdisk /dev/sdb
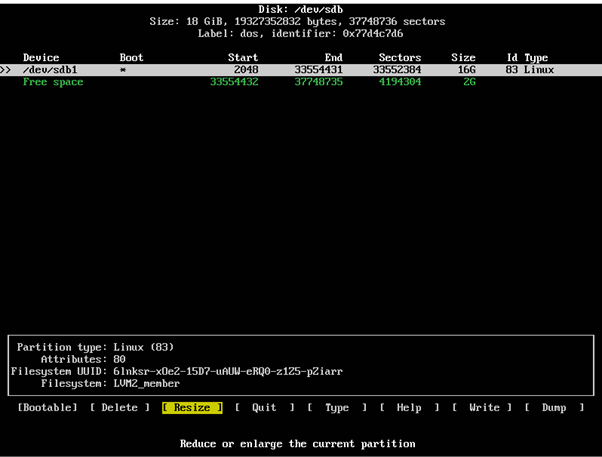
- Select the Resize menu in the bottom. Once resize is selected, it displays the disk size after resizing as 16GB (or the size that was set in step 1 above).
- Select the Write menu, to write the new partition table on disk.
- Select Quit to exit from command.
- Expand the file system on the root partition:resize
sudo resize2fs /dev/sdb1
- Verify the size of the disk partition:check disk size
df -h
- The following ports shall be open to traffic to and from each Docker host participating on an overlay network:
- TCP port 2377 for cluster management communications.
- TCP and UDP port 7946 for communication among nodes.
- UDP port 4789 for overlay network traffic.
- Copy upgradeFrom5.13.tgz to the manager node (node where administration service is running) and all worker (other) nodes. In this setup we will set and consider the administration-service node as the manager node.
Extract the tar file:
Extracttar -xzf upgradeFrom5.13.tgz
- Set up the docker daemon and pull images:
- Verify the Digital Access tag in versiontag.yml (<path to upgrade folder>/docker-compose/versiontag.yml) file. The same tag will be installed as part of the upgrade. If it is not the correct tag, update it manually.
- Although the upgrade script installs docker and pulls the images from repository, it is recommended to install docker and pull the images before running the upgrade. This will reduce the script run time and also the downtime of the system.
Run the script pull_image.sh to pull images on all nodes.
In case of offline upgrade, load the Digital Access docker images to the machine. Also, if you are using internal postgres, load postgres:9.6-alpine image on the manager node.
Pull imagessudo bash upgrade/scripts/pull_image.sh
- Make sure there is a backup/snapshot of the machine before starting the upgrade.
Step-by-step instruction
Upgrade manager node
Upgrade worker nodes (Only applicable for High Availability or distributed setup)
Do final steps at manager node
Verify if all nodes are part of cluster by running this command.
Verify if all nodes are part of clustersudo docker node ls
Example:

Identify nodes ID, master and worker where the service will be distributed.
Identify nodessudo docker node inspect --format '{{ .Status }}' h9u7iiifi6sr85zyszu8xo54lOutput from this command:
{ready 192.168.86.129}IP address will help to identify the Digital Access node.
- Log in to Digital Access Admin. If you use an internal database for configurations, provide the host machine IP address to connect the databases (HAG, Oath, Oauth).
- Publish the configurations.
- Change the internal host and port for each added service according to the docker-compose.yml and network.yml files.
- Go to Manage System > Distribution Services and select the checkbox for “Listen on All Interfaces” in case of the ports that are to be exposed.
- Go to Manage System >Access Points and provide the IP address instead of the service name. Also enable the "Listen on all Interfaces" option.
- If you want to enable the XPI and SOAP services, the expose port ID should be 0.0.0.0 in Digital Access Admin.
Redeploy the services using this command on the manager node:
Deploy Digital Access stacksudo bash /opt/nexus/scripts/start-all.sh
This article is valid for upgrade from Digital Access 5.13.1 and above to 6.0.5 or above.